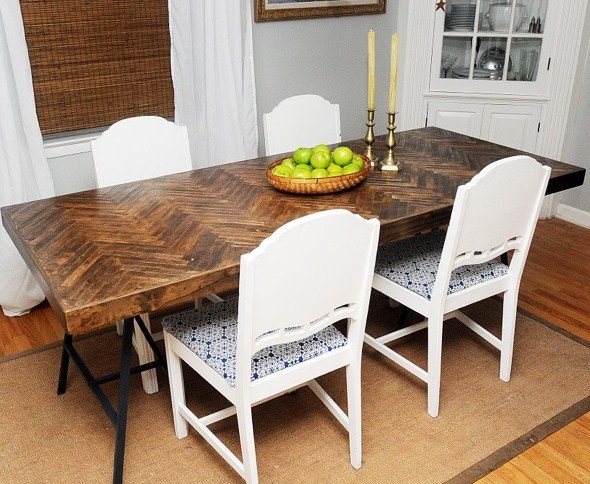
Ta Da…Here it is! The herringbone dining room table I made out of paint sticks and an old door.


I won’t lie to you, this table involved some blood and sweat. It also took more than 300 paint sticks, 1,000-plus brad nails and a bottle of wood glue. But it’s finished!
(Check out this earlier post for more information about the planning process.)
Let’s get right to the how to.
Step 1. Cut the paint sticks to remove the curved grip area on the handle.

Step 2. Measure your surface, which in our case was an old door we had hanging around in the basement. Find the center point and snap a chalk line or draw one using a straight edge and a pencil. Lay out the first row of your herringbone pattern with the V directly following along the center line. Use a square to make sure your sticks are at a perfect 90-degree angle.

Step 3. Start nailing. Once you get the pattern the way you want it, start gluing and nailing it down. I ran a bead of wood glue along the back of each stick and then used a brad nail gun to secure the pieces, which worked great (once I figured out how to use it). I was initially a little, shall we say, overzealous with the nails…but settled into a three-nail per stick pattern after my husband threatened to take the nail gun away.

Be very careful not to let your V stray from the center line or your whole design will wind up drifting.
Step 4. Realize it’s crooked, rip it off and start over…twice. You should strive to skip this step.
Step 5. Continue your pattern. Once you get the first row done, and straight, the rest is relatively easy. Just continue to lay row after row in your pattern. Keep checking with your square to make sure your V’s are at the correct angle and that your rows are straight.
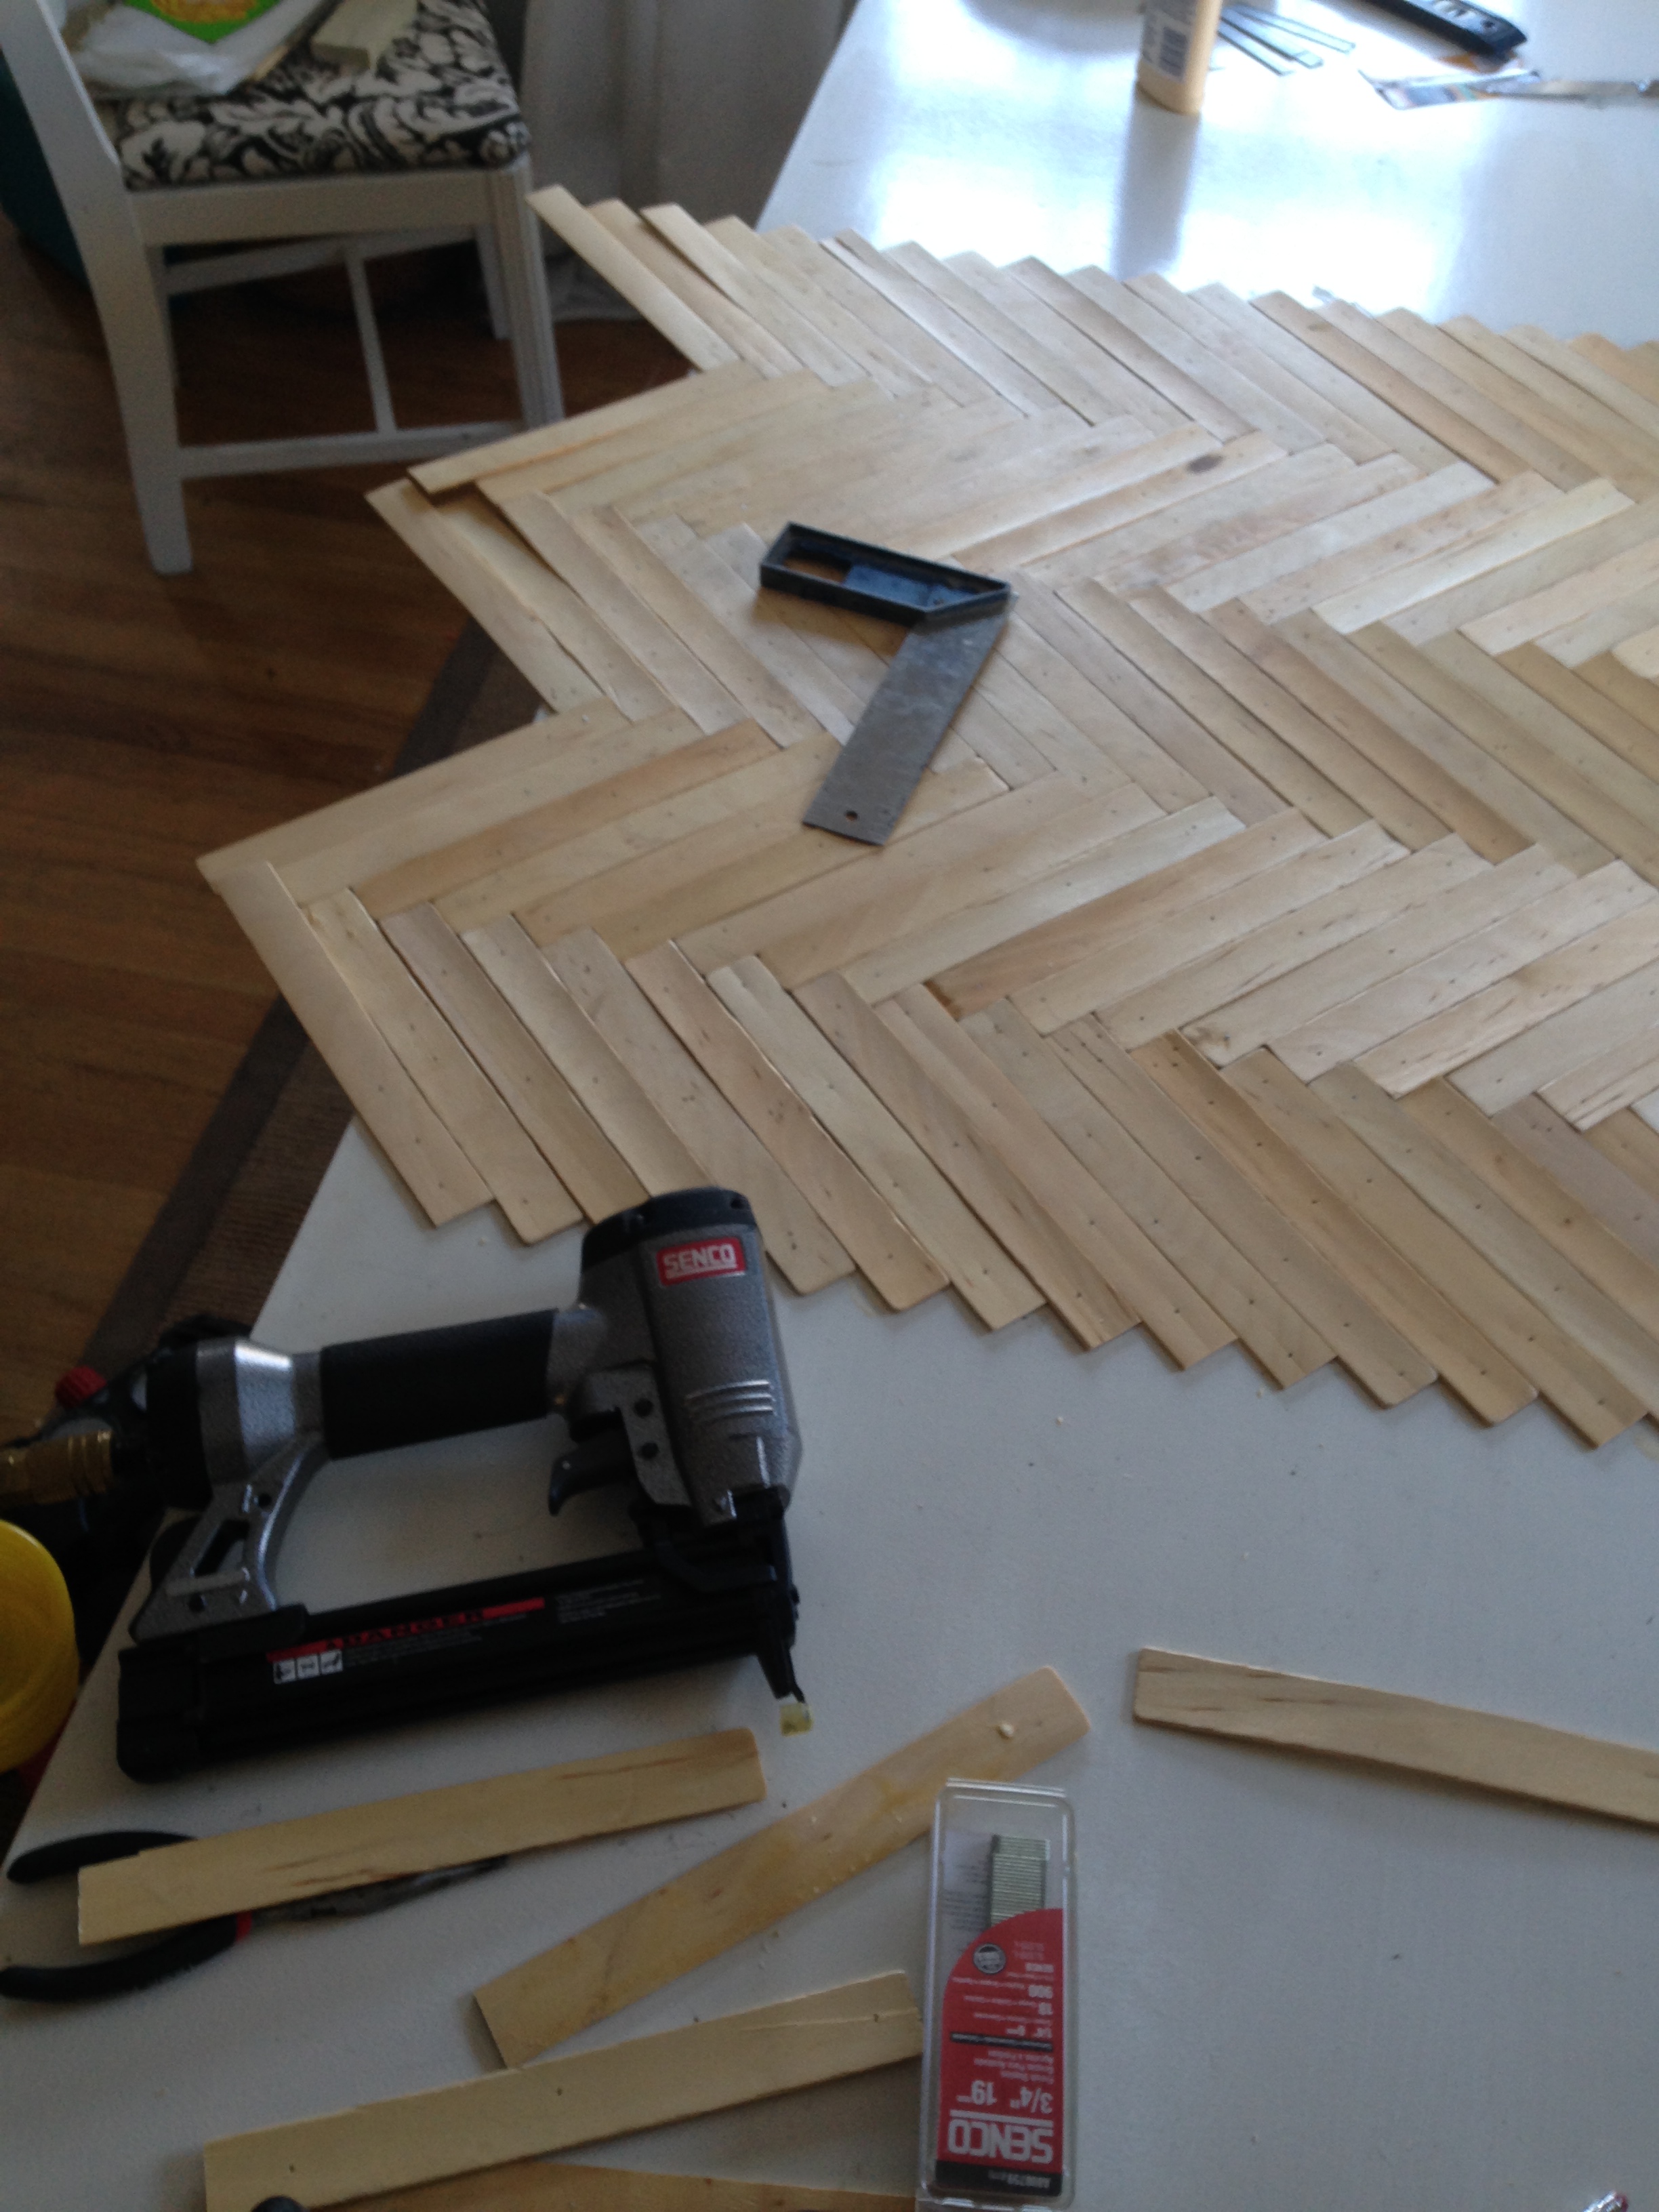
Keep in mind that the fine people who make paint sticks don’t put whole a lot of time into ensuring that these little guys are perfect rectangles. After all, they’re made to take a swirl around a can paint and get tossed into the trash can. So, no matter how hard you try your pattern probably won’t be perfect.
Step 6: Trim the edges. I glued and nailed sticks so they extended beyond the edge of the table. It’s easier to come back and trim them off with a saw than it is to meticulously cut sticks to fill in tiny little gaps.
Well, at least this is true in theory.
Paul helped me out by trimming the edge of the table with a jigsaw. The only problem was that that the edges of the sticks got a little chewed up by the saw blade and some of the tiny end pieces got ripped off entirely.
Enter wood filler and a steak knife.

Step 7: Make repairs. I used the wood filler to smooth out the scuffed up edges and to fill in the larger gaps between sticks.
I used the steak knife to cut the tiny pieces I needed to fill in small triangular holes along the edge of the table.

(I know, Bob Vila isn’t exactly breaking down my door to ask for carpentry advice.) That said, the knife was actually a perfect tool, because it made it easy to get the precise cuts I needed.
Step 8: Get sanding. One the table was trimmed up and the wood filler dried, I ran over the entire table with a palm sander to give it a nice smooth finish.

Step 9: Trim and stain. Finally, Paul helped me add a trim piece to finish off the edge of the table and it was time to add the final touch, stain. I used a can of Dark Walnut I had in the basement and applied it in a few even coats.
As you can imagine, paint sticks don’t take stain very evenly. But in this case I think the variation just enhances the design and the rustic feel of the table.
After the stain dried, I came back in and applied a couple of coats of satin polyurethane.
In the end, I’m really happy with how it turned out.
Now I just need to get started on the rest of the dining room…
Sharing at: http://www.savvysouthernstyle.net/2014/05/wow-us-wednesdays-171.html

This is really, really awesome. I’ve thought about making a herringbone table with wood inlay, but was going to use scraps of thicker wood. I love that you used the paint sticks – so much lighter and easier. Way to go!
Thanks Jane!
Wow this is awesome! Love it. How did you get so many paint sticks? I am stashing some away for a project and I get funny looks every time I snag a handful of stir sticks! LOL
Hi Sarah –
Thanks! I actually thought about trying to “collect” them from paint stores, but figured it would take me a year to get the amount I needed. ha-ha. So I actually ended up ordering them from this place. http://www.skygeek.com/skygeek-pp-12-wooden-paint-paddles.html
Kelly
Well this beyond incredible – really – I can’t tell you how amazed I am by this – what a gorgeous job you did – creative perfection !!!
xxx
Thanks Suzan! I was just checking out your blog – you do beautiful work!
This is EPIC. I appreciate the attention to detail. And the finished product is just so stunning. Well worth the effort! Brava!
Thanks so much Lauren!
Totally amazing and dedicated!
How did you get so many paint sticks?? The hardware stores around here are generous if they give you 4! And some are concaved too for stirring….
Nancy
wildoakdesigns.blogspot.com
Hi Nancy –
Thanks! I actually ordered them online. I did think about trying to “collect” them but I figured it would take too long. : ) This is the site I got them from. Some will be a little warped when you get them. I found it helps to tack one part in place and then bend the stick to straighten it out. Sometimes they will crack, so make sure you order extras.
Kelly
This must be the most amazing DIY table out there – it’s absolutely stunning – I’m pinning now and just may try this out myself !
Thanks so much for sharing – you’re amazing!
XOX
Thanks so much Suzan!
This is unbelievable!! I’m in total awe of you and your patience to finish this. Definitely sharing this beaut 🙂
Thanks Breanna!
I followed your directions and did this! Turned out pretty good!! What do you think? https://thewestsidecollectivetruck.com/pages/rentals
Wow! The door looks fantastic! Love it.
Kelly
Oh my gosh, this was very entertaining to read and informational at the same time. 😀 going to start a similar project this weekend. thank you for being brave and creative! -Leslie